Create Live Encoding Session
To create a new Offline or Live encoding session, on the Encoding page click the + New Encoding Session to launch the wizard to walk you through the creation.

The user can navigate back and forth by using the Back and Next buttons, without losing any changes, until they either click Cancel or Save on the last page.

1. Select Type
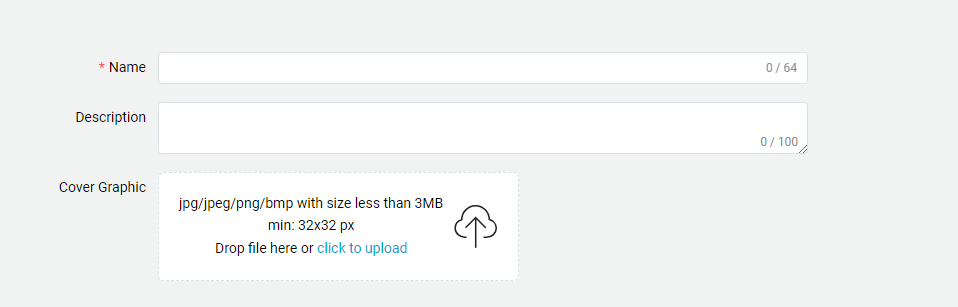
This section allows the user to provide:
| Parameter | Required | Description |
|---|---|---|
| Name | Yes | Provide a name for the encoding session |
| Description | No | Provide a description for the encoding session |
| Cover Graphic | No | Provide a cover graphic that can be displayed on the encoding page and as the background of the video preview when not being used |
The next section allows the user to select the desired Session type.

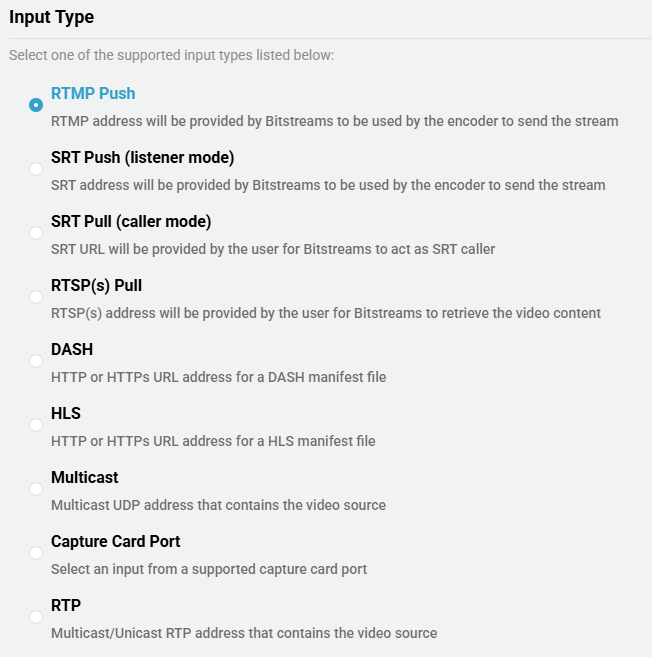
2. Input Type
Select one of the supported input types, and enter in the URL address, if required
| Parameter | Input URL | Note |
|---|---|---|
| RTMP Push | No | Allows for a custom stream key to be create, if left blank then an autogenerated key will be created. |
| SRT Push (Listener Mode) | No | Allows for a custom stream key to be create, if left blank then an autogenerated key will be created. Supports adding a custom or autogenerated passphrase for encryption. |
| SRT Pull (Caller Mode) | Yes | SRT stream ID has to be properly URL-encoded, also supports encryption. |
| RTSP(s) Pull | Yes | RTSP Syntax Examples |
| DASH | Yes | |
| HLS | Yes | |
| Multicast | Yes | Multicast Syntax Examples. Multicast Failover. |
| Capture Card Port | No | See Below |
| RTP | Yes | Only MPEG-TS payload is supported (RTP payload_type 33) |
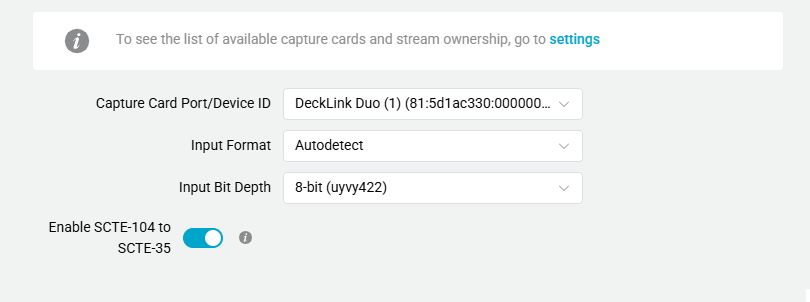
Capture Card Port
On selecting Capture Card Port, the following options appear:
| Parameter | Value Range | Description |
|---|---|---|
| Capture Card Port | Decklink Input Ports | Specify which input port to be used |
| Input Format | Autodetect, Supported Formats | Selects the input resolution and framerate. Autodetect will automatically set the resolution and framerate according to the input. |
| Input Bit Depth | 8-bit, 10-bit | Sets the input bit depth to 8-bit or 10-bit. 10-bit input can be used for HDR content. |
| Enable SCTE-104 to SCTE-35 | Enable/Disable | Captures SCTE-104 messages from SDI VANC data and converts them into SCTE-35 data packets for downstreams output (eg HLS/CMAF muxers) |
Not all Blackmagic cards support HDR. Make sure to check on Blackmagic's website if HDR is supported by the card.
To make sure Bitstreams detects the Blackmagic SDI card correctly, please follow the instructions to Setup Blackmagic Decklink Cards
Input Features
Bitstreams supports several features for the Input, for more details visit Input Features
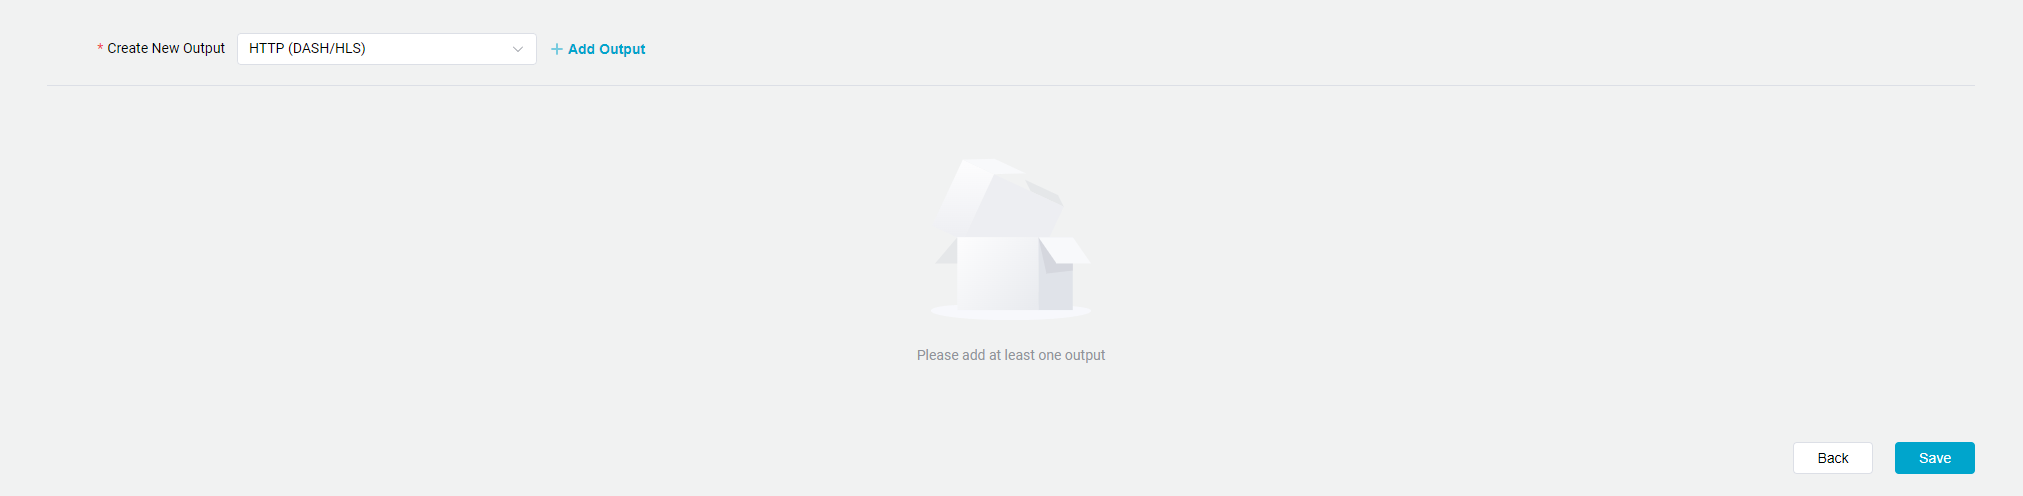
3. Output Type
Using the drop down option, select the desired output type and click + Add Output. Multiple output types can be added to the same input, after all desired outputs are added and configured, click Save to continue. If more than one output has been configured, a trash can icon will be added to each output. This will allow the output to be removed.
CMAF Push (DASH-IF)

| Parameter | Required | Description |
|---|---|---|
| Output Name | Yes | Provide a name for the output. |
| Stream Configuration | No | Only applies when the input is UDP, SRT or RTP. Open a dialog box to configure the Service Provider Name and to enable Stream Mapping |
| Base URL | Yes | Provide Base URL |
| Enable ID3 | No | Generates timed ID3 tags with presentation timestamps (PTS) as a separate CMAF metadata track. Audio/video content passes through unchanged. Used for player synchronization and custom features. |
| ID3 Interval | No | ID3 Interval in ms |
DASH / HLS


| Parameter | Required | Description |
|---|---|---|
| Output Name | Yes | Provide a name for the output. |
| Stream Configuration | No | Only applies when the input is UDP, SRT or RTP. Open a dialog box to configure the Service Provider Name and to enable Stream Mapping |
| Template | Yes | Select the desired Template |
| Settings | Yes | Hover over the cell and click the gear icon for additional settings. |
Stream configuration only applies when the input stream is UDP, SRT or RTP and with specific outputs. It also allows setting the Service Provider Name and Program Number for all inputs with SRT Push or Multicast/UDP Outputs.
Additional Settings
| Parameter | Description |
|---|---|
| Enable DASH | Enable or Disable DASH playback option |
| Enable HLS | Enable or Disable HLS playback option |
| Visibility | Enable or Disable Visibility by using Signing Keys Public: No signing key required to access the stream Private: Signing Key is required to access the stream |
| Recording | Enable or Disable Manual Recording of the HLS output, more details see VOD Recording |
| Custom Manifest Name | Allows to configure custom manifest names, which must be unique. Defaults to the encoding session and output name separated by an underscore ( _) |
Requires to have at least either DASH or HLS enabled.
RTMP Push

| Parameter | Required | Description |
|---|---|---|
| Output Name | Yes | Provide a name for the output. |
| Template | Yes | Select the desired Template |
| Configuration: Single URL Mode | Yes | If enabled will use Enhanced RTMP output with a single output for an ABR ladder. If disabled will use legacy/enhanced RTMP with multiple outputs for an ABR ladder. This feature is disabled if the template has only 1 video output defined. |
| Output URL | Yes | Each output resolution requires a different and unique address. |
When Single URL Mode is disabled, Bitstreams will automatically decide if Enhanced RTMP needs to be used depending on the template selected. If the template has only one H.264 video stream and one AAC audio stream, then Bitstreams will use legacy RTMP, if a different video codec or multiple audio channels are configured in the template then Enhanced RTMP will be used.
When Enhanced RTMP is used, the upstream RTMP server will need to support enhanced RTMP as well.
SRT Push

Currently SRT Push only operates in caller mode.
| Parameter | Required | Description |
|---|---|---|
| Output Name | Yes | Provide a name for the output. |
| Template | Yes | Select the desired Template |
| Output URL | Yes | Each output resolution requires a different and unique address. For details on adding a streamid see SRT Syntax |
Multicast

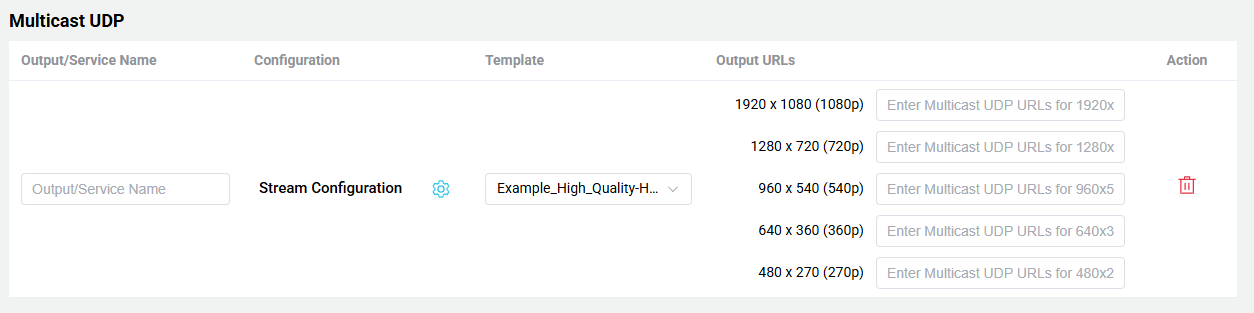
| Parameter | Required | Description |
|---|---|---|
| Output/Service Name | Yes | Provide a name for the output. This parameter also configures the Service Name |
| Service Provider Name | No | Applies to all inputs Add the Stream Provider Name to the output MPEGTS Transport. If this field is not populated then Bitstreams will be used. |
| Stream Remapping | No | Only applies when the input is UDP, SRT or RTP. Open a dialog box to configure the Service Provider Name and to enable Stream Mapping |
| Template | Yes | Select the desired Template |
| Output URL | Yes | Each output resolution requires a different and unique address. For more details on Multicast UDP Syntax |
File

This feature allows for the continuous recording of the input stream. The recording process continuously creates new files based on the Max File Duration parameter.
Bitstreams does not manage the storage space on the server, the user must ensure there is enough storage and it is recommended to mount an external drive to the /mnt folder on the server.
| Parameter | Required | Description |
|---|---|---|
| Output Name | Yes | Provide a name for the output. |
| Template | Yes | Select the desired Template Only templates with a single output resolution are supported |
| Format | Yes | Select the output container format of the recorded files |
| Max File Duration (seconds) | Yes | Select how long each output file will be before a new file is created |
| Location Path | Yes | Select the location where the files will be saved, within the /mnt directory. |
The output file directory will automatically be created along with subdirectories to help easily find recordings based on the date the recording occurred.
Bitstreams does not manage the storage space on the server, the user must ensure there is enough storage and it is recommended to mount an external drive to the /mnt folder on the server.
SDI Output

| Parameter | Required | Description |
|---|---|---|
| Output Name | Yes | Provide a name for the output. |
| Template | Yes | Select the desired Template Only templates that have a codec as RAW (SDI) will be available. |
| Output URL | Yes | Select the unused SDI port |
To make sure Bitstreams detects the Blackmagic SDI card correctly, please follow the instructions to Setup Blackmagic Decklink Cards
AWS MediaPackage

This feature allows pushing the output to AWS MediaPackage v2 using HLS. To successfully push to AWS MediaPackage v2, AWS credentials must be added to the account. The AWS credentials can be added from the Settings tab under Credentials > Secrets. Please see additional details on the Secrets Page
| Parameter | Required | Description |
|---|---|---|
| Output Name | Yes | Provide a name for the output. |
| Template | Yes | Select the desired Template |
| Ingest URL | Yes | Ingest URL provided by AWS MediaPackage |
| AWS Credentials | Yes | Select saved AWS credentials. If no credentials are saved, new credentials can be added using the Manage Secrets button. |
WHIP (WebRTC)

This feature is used to push the stream to a WebRTC server.
| Parameter | Required | Description |
|---|---|---|
| Output Name | Yes | Provide a name for the output. |
| Template | Yes | Select the desired Template. Only templates that have an audio codec of Opus will be shown. |
| WHIP URL | Yes | Ingest URL for the WebRTC Server |
| WHIP Auth Token | Yes | The Auth token for the WebRTC Server |
Once the session has been created, the user will be redirected to the Encoding Details page.